Diary of a Model Railroad, Part Five

Alright, alright. Yesterday I promised photos. But today I’m too excited to wait until I’ve uploaded them all – it’s done!

I once heard on a video that “a model railway can be finished, but it is never completed.” This is very much true for mine, which is presently nameless. I finished up the wiring this morning and tested it all, and all tracks work electrically, and I was able to fix most of the problems. I have a couple of pieces that I will need to pull out and actually fix (including a very sharp turn that I was aware of when laying, but ignored. Now I get to fix it.)

It is a very operationally intense layout. To get any of the cars from storage to a business requires the loco to run around them, and with one exception requires at least one switchback. I’ll draw up a diagram later and probably post tomorrow (with photos?) to show where things are and how it is intended to work.

Once I fix the couple of minor track faults I’ll be ready to consider scenery. I also need to create a control panel which will also involve tidying up the wirings underneath, then I can look at wiring turnout motors (and hoping they all work electrically). Another pressing issue is the electrical connections between the two sections and the control panel. The right side needs to have 4 blocks plus ground (so 5 pins) and the left needs 6 blocks plus ground (7 pins). Additionally, the left side has 5 turnouts that need to be switched and the right side has 8. Some of those can be combined, but I still need 4 pairs of circuits (9 pins – 4×2+ground) to the left and at least 4, possibly 5 or 6 to the right.

Such questions can wait to be answered tomorrow. I have more practical things to do tonight, like socializing!

Diary of a Model Railroad, Part Four

I had hoped to have some more photos ready for this post, but they’re on my camera and that’s in the car, 20 minutes away. Maybe next time.

Anyway, I have very nearly completed the first half of the layout. The right-hand side has all but two pieces of track laid, and all but one set of track feeders in place. I’ve begun laying the matching track pieces on the left hand side, and this is basically where I’m holding myself up. 4 pieces of track cross the line between the two sides, and of these 2 are done and dusted. The third needs me to lay a curved piece of flex track across the line, and this is where I lose excitement. I want to do this section first, because the fourth and final section to cross the line is the one that actually has a useful purpose on the left hand side, rather than just being sidings to store cars for businesses that the model will ‘serve.’

I divided the whole layout into several sections. I doubt I’ll ever operate it with more than one person, but in theory it could be operated with two engines, and with the split sections that becomes a little easier with basic DC power (since I’m underfunded for DCC right now..). For now I’m tying all of the feeders for the sections to each other and then I’ll link those to a single pair of wires to the controller until I make a real control panel with switches etc. I also need to find some 3-way wire to wire the turnout motors, but again that can wait. My goal is to be able to drive on at least part of it by the end of the week.

In other news, I’m fast running out of solder, so I may need to hunt down some more..

Diary of a Model Railroad, Part Three

Finished! Well, not quite. The bench-work is mostly finished. It needs to be sanded off at the ends especially, and I still need to finalize how they will attach to each other. I’m thinking maybe a clip on each side to hold it horizontally, and maybe a door lock thing to hold them in alignment? Other than that, I’m mostly happy. I have photos too, I’ll tell the story from when I started (again – the successful attempt ;-))

July 7th

It starts out with Crash looking like a lazy dog. He really is.

This is an overview of where I was up to on July 7th. The outer frame of one section was complete, and the cuts had been made for the second section, with pieces screwed in to line the up, it was ready to glue and screw together.
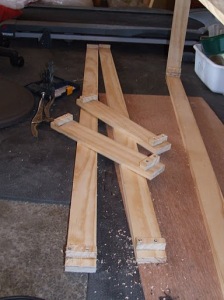
These are the pieces. Give or take (I measured them to be the same length as each other, not to an exact number of inches) they are 2x 5 foot pieces and 2x 1.2 foot pieces. Screwed and glued into each are two 3/4″ x 3/4″ pieces which are used to easily align each piece with it’s join partner. They are then glued at the corners and clamped together for a couple of hours, then screwed. Below, an end has been glued and clamped.

July 8th

I realized that there wasn’t a great deal of structural support, and that for sections that are likely to be pulled out and put away fairly regularly support is probably a good idea. So I measured and cut two support pieces to fit roughly half-way down each section and then drilled three half-inch holes for wiring to go through, and glued and screwed in the same way as the rest of the base. Here, the first is clamped and waiting for glue to dry.

The support supports are gluing on the second frame, when these are dry some more they will be screwed down into the outer frame and the support will be glued to them and then screwed.

I hung out with Crash for a bit while the glue dried!

The frames were finally finished. One is fairly warped, but I don’t plan on exhibiting this layout and it’ll likely be warped with time and transporting anyway, so I’m not overly worried. With the ply nailed down, it doesn’t seem too terrible. I doubt it will cause any major issues (famous last words?)

July 9th

“I claim this foot in the name of Doglandia Forever Woof Woof!”
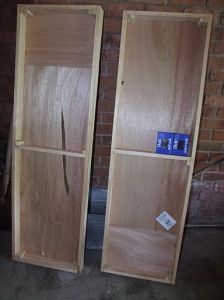
I nailed down the tops this morning. Here are both from the bottom…
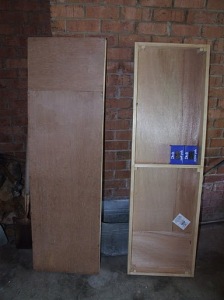
And one from the top. Basically, because they are 5 ft by 1.5 ft each, I used a 4ft square piece of ply and cut two lengths of 4′ x 1.5′ and then two pieces of 1′ x 1.5′ and had a 1′ square left over.

This is the end of one of the sections – both sections have one end like this (I guess the sides weren’t exactly 5′ long!) and one has sides that are a little like this too. They’ll both get sanded back at some point, probably next week now.

I only had 3 incidents while nailing. Two like this, where I nailed at an angle far enough that it poked through the frame. One on each section, and I was able to push them back out so that with some sanding they probably won’t be noticed. I’m considering some 1×4 to go around this all, partly for strength, partly for keeping most track below top surface level (and thus protected a little more). The third incident was near the end of the first section. I’d been using a pair of vice grips to hold the nails to try and keep them vertical, and I elected to do one with just my fingers. Some of you may have seen my earlier tweet that read “OW! Thumb + hammer = pain” – and that’s precisely what happened. Fortunately it is my left thumb that is afflicted, so while it is still pulsing a little (some two hours after I hit it) it’s not causing me too much problem.

Diary of a Model Railroad, Part Two

The last update on this project was two months ago. Far too long, now that I am thinking about it.

However, progress is finally being made. I forgot at the beginning, that my ability to cut straight is entirely defined by what I happen to be using as a guide. When that guide is my eye and a steady hand, it doesn’t work out so well.

I had to use one of my 1×3’s to reinforce some of the breaking slats on the base for our bed, so it was a useful way to recycle the cuts I had made that were mostly useless for this project anyway. Now having borrowed a miter box and come up with a better design for connecting the pieces together, the whole thing is coming along much more smoothly. I just took a few photos of where things are at, but I’ll probably just upload those with Part Three, which I expect will be later in the week some time.

The layout is going to be in two sections, each roughly 5 feet long. The outer frame for one section is complete, the second one is undergoing it’s second-to-last gluing, which will then be screwed together followed by the final gluing and screwing. After that I will be considering the need for a cross-brace in the middle of each, especially considering the need to be able to relocate the sections multiple times. I also need to acquire some suitable nails with which to attach the top to the frame, and figure out a cheap and easy way to line up the ends of each section accurately when I’m putting them together. Maybe some locking clips on the sides?

For now though, I need to go fill out job applications while my glue dries.

Diary of a Model Railroad, Part One

For all of you who thought I couldn’t get any nerdier and didn’t know of this hobby, I guess I’m about to get nerdier (in your books, at least).

Over the last couple of months my dreams of creating a layout of some description have started to take shape – from expanding my rolling stock collection to buying track. Tonight the benchwork was laid – somewhat literally. I bought a 4’x4′ piece of plywood, and marked it up for cutting and made the first cut. I also began the mental planning for the surrounding benchwork to hold it up.

The plan is for two 5′ sections bolted together to form a 10′ long by 18″ deep shelf layout. A modified version of Atlas’ Southside Connecting layout (see here) is the trackplan – I’ll be using #4 switches instead of #6’s, I’ll also be replacing the turntable with a turnout. I need to start laying the track before I buy any diamond crossings – lest I buy the wrong angle. Although mostly using set-track as laid-out in the plan, I’ll be replacing sections with flex also.

Because I’m still too poor for DCC, I’m intending to wire the layout for two DC controllers (although it’ll also be just one controller for now). Further, I plan to wire for electric switches – whether they get used up front or not remains to be seen.

I have some ideas for scenery, I’d like to have a chicken-wire style fence with an opening gate (slow-action point motor is most likely, maybe something more custom) and a road crossing in my bustling industrial area. I’m thinking a container terminal would give purpose to my husky stack cars, an oil refinery almost seems to cliche for my tank cars, a warehouse holds an obvious purpose for box cars, perhaps a grain silo for my covered hoppers. I also have some open hoppers which could see some form of purpose, and some passenger cars which most likely won’t run on the layout (except for a push up and down to make sure they roll acceptably).

The ends of my run-arounds will need to be big enough for my long 6-axle locos – prototypically used as switch locos in my area. I’ll also then be able to run the small switch locos back to back or almost any other number of switching possibilities.

Still to be thought about is the placement of uncoupling magnets. I also haven’t decided on how I’m going to do backboards (or even if I’m going to do backboards). In terms of connecting the two sections together I’m probably going to do the traditional bolts, but I’m also working on a reliable way to ensure accurate lining up every time. I don’t want to deal with D-sub connectors, but 24-pin ATX plugs may work. The biggest flaw will be the number of sections I need to switch on and off as well as the number of switches I need to cater for. Also, I need to work on legs, and I have an idea for a case which all the parts will slide into securely for transportation and storage.

So to sum up, once again, I have all the engines and probably rolling stock I need, I also have most, if not all, of the track that I need, and I’ve finally started working on the benchwork. The next steps are to finish putting the lumber together to form a solid table that can join and separate reliably, and then finalize the track plan based on the finished benches.

Modelling

I currently have 3 active model railroad projects going that are all at 3 different stages.

Firstly, my coffee-table N-scale has all the track required, but nothing to put on it, nor anything to put it on. I know I need a baseboard of approximately 24″x40″, but this has not been purchased, nor has any other framing or electrical equipment.

I have two HO scale layouts still in planning, despite having a large amount (I cataloged it today, more later) of HO scale rolling stock.

I have basic track plans for both of these, the first is based on an Atlas track plan that my Dad and I started work on several years ago and never really got far with. I’m going to modify it a little to allow some mainlines on the front (that can connect with something else when I get that far), and connections from said mainlines to the yard area. I still need to work on how that part is going to work – I’m thinking block-sectioned DCC to allow signaling and automated running.

The second layout is based on an old standard, the Timesaver. This will likely be modified in the same way as the yard above, to allow mainlines with connections. The timesaver would still be able to run either independently or as part of the wider layout (again, when I get that far).

Both of the above would be built on a pair of modules each, and I’ll look at building framing for them both to allow for safe traveling.

What are the next steps? The N scale needs a base-board and rolling stock. I also need some wiring and other wood to build a real table for it to sit in the bottom of. A friend of the family has some cherry wood for free, I need to see what I can do with it.

The Yard layout, I’m awaiting the plans to be sent to me, so I can plan the appropriate modifications, and I can start buying the set-track to complete it, and appropriate sized lumber.

The Timesaver I need to finish the track diagram and purchase the appropriate track and timber. I’ll also probably do this layout with flex track.

Oh yeah, the catalog. On Google docs I made a catalog of all my HO scale rail-bound vehicles (IE, not the containers). I have 14 locos – 12 Norfolk Southern, 1 Union Pacific (Desert Victory!), and 1 Tranz Rail (Bumble Bee DC). I have 9 Passenger cars – 7 B&O, a Union Pacific and a Renfe (Spanish). I also have 19 freight cars, counting the 2 5-unit articulated well sets as 1 each. I’m trying to get a hold of some flat cars (mostly for the time-saver) and a lot more Norfolk Southern/Norfolk Western/Southern branded hoppers (covered and not). I also need a bogie-side for my GP38-2, and a bunch of Digitrax chips. About 7 British Rail Mark 2 cars wouldn’t go amiss either, so I can paint them in the Capital Connection colours.